
Introduction
A long time ago (in a galaxy far, far away), I began this series with the intention of blogging about using Jenkins to orchestrate some tasks on z/OS. I did an introduction to Jenkins and one on groovy pipelines, but then got a little frustrated.
Having got a Jenkins node running in z/OS (“look what I can do!”), I ran into a bit of a problem: “What can you do?”. All of the things that we traditionally want to do in z/OS – run batch jobs, tinker with the z/OS configuration, check the SYSLOG, etc, etc? We can’t do any of those with the native Jenkins node.
Then, along came the IBM z/OS Open Automation (ZOA) Utilities – see my blog series on Ansible on z/OS for more on these – and the game changed again. Now we can do all of those things from z/OS Unix System Services (USS), and suddenly our team Jenkins server can do a huge amount of work on z/OS as well as all of the other build and test platforms.
In this blog post, we’re going to look at what we need to do to run a Jenkins node on z/OS. It should be noted that this runs as a process in USS, and we’re going to assume that you’re comfortable there. In many ways this is a regular Posix Unix environment, albeit with extensions to reflect the fact that we’re running as part of z/OS.
Why Do This?
Because this enables mainframe integration with Jenkins, and as we’ve seen previously, Jenkins is at the heart of the DevOps automation revolution. If we want to do coordinated build and test work across a host of platforms, then we need to bring z/OS to the party.
But Why Not Just Use the Jenkins z/OS Plugin?
The z/OS plugin that’s available in Jenkins uses an FTP client to submit batch jobs and retrieve the output. The problem is that this passes userids and passwords in plain text, and this is a challenge in a modern mainframe service network.
To enable this, the z/OS FTP server (TCPIP.FTP.DATA) parameter JESINTERFACELEVEL needs to be set to 1 or 2. The z/OS 2.4 notes on this are here.
If you can ignore the security exposure, the other challenge with the plugin is that it is limited to submitting batch jobs and retrieving results, whilst the Jenkins node can do anything that its runtime user can do in USS, which with the ZOA Utilities is quite a lot!
Setting up the Jenkins Node on z/OS
Overview
We’re using:
- z/OS SSH Daemon (SSHD). This is used to provide connectivity for Jenkins to launch the nodes. You’ll need to know what port it presents on (usually 22) – check with “TSO NETSTAT” and look for SSHDn (where n is an integer)
- Java – the IBM 64-bit build. From OMVS:
$ java -version
java version "1.8.0_261"
Java(TM) SE Runtime Environment (build 8.0.6.16 - pmz6480sr6fp16-20200902_01(SR6
 FP16))
IBM J9 VM (build 2.9, JRE 1.8.0 z/OS s390x-64-Bit Compressed References 20200901
_454898 (JIT enabled, AOT enabled)
OpenJ9   - 2799ddf
OMR      - b348d97
IBM      - 5371022)
JCL - 20200831_01 based on Oracle jdk8u261-b13
- ZOA Utilities – to expand the capabilities of the USS environment
- Rocket Software Open Source Tools – specifically the git client and bash shell
We’re not covering the installation of these in this blog, but we will refer to their installed locations and reference these when setting up the node environment, as follows:
| Tool | Environment Variable | Value |
| Java | JAVA_HOME | /usr/lpp/java/J8.0_64 |
| PATH | $JAVA_HOME/bin | |
| LIBPATH |
$JAVA_HOME/bin $JAVA_HOME/lib/s390 $JAVA_HOME/lib/s390/j9vm $JAVA_HOME/bin/classic |
|
| CLASSPATH |
$JAVA_HOME/lib $JAVA_HOME/lib/ext |
|
| ZOA | ZOA_HOME | /usr/lpp/IBM/zoautil |
| PATH | $ZOA_HOME/bin | |
| LIBPATH | $ZOA_HOME/lib | |
| Rocket | PATH | /rocket/bin |
It’s probably also worth noting that we’re using a Windows based Jenkins server / controller. This includes a local (on Windows) worker node as well.
Installing
Jenkins runs in Java and contains the means to start nodes on other services. To do this it makes an SSH connection and uses this to send the node JAR and start it up. The node runs in the context of the userid used by Jenkins to connect to z/OS.
Once we have created the userid, we configure a script in USS to establish the environment for the Jenkins node to run in (hooking the Rocket tools and ZOA Utilities, as well as setting up file tagging).
Some filesystems are then created to support the work and Jenkins temporary paths and finally we establish the SSH key pairs to support passwordless connectivity.
Then it’s back to Jenkins to complete the configuration and start the node.
These steps are all covered in more detail, below:
z/OS Userid
In this example, we’re creating a userid (DBADB2T) which can run some batch workload against our DB2T (DB2 for z/OS) service. The ID requires an OMVS segment to be able to run (a Jenkins node) in Unix System Services (USS), and we also make the password non-expiring.
The user’s catalog alias is also defined, and the home directory (automagically) as well as the work and temp directory paths to be used by the Jenkins node – we’ll create the filesystems for these later on:
//DEFUSER EXEC PGM=IKJEFT01,REGION=4M,COND=(0,LT)
//SYSTSPRT DD  SYSOUT=*
//SYSTSIN  DD  *
  AU DBADB2T NAME('Jenkins DBA DB2T') PASSWORD(PA55WORD) +
     OWNER(IBMUSER) DFLTGRP(DB2TADM) UACC(READ)    +
     TSO(ACCTNUM(ACCT#) PROC(ISPFPROC) JOBCLASS(A) +
         MSGCLASS(X) SYSOUTCLASS(X) SIZE(2096128) MAXSIZE(0) +
         COMMAND(ISPF)) +
     OMVS(AUTOUID HOME(/u/dbadb2t) +
          PROGRAM(/bin/sh))

  PW USER(DBADB2T) NOINTERVAL
  ALU    (DBADB2T) PASSWORD(SAUSAGE) NOEXPIRED

  ADDSD 'DBADB2T.*' UACC(READ)
  PE    'DBADB2T.*' ACCESS(ALTER) ID(DBADB2T)
  PE    ISPFPROC CL(TSOPROC) ACCESS(READ) ID(DBADB2T)
  SETROPTS RACLIST(TSOPROC) REFRESH
  PE    ACCT#   CL(ACCTNUM) ACCESS(READ) ID(DBADB2T)
  PE    JCL     CL(TSOAUTH) ACCESS(READ) ID(DBADB2T)
  PE    RECOVER CL(TSOAUTH) ACCESS(READ) ID(DBADB2T)
  PE    MOUNT   CL(TSOAUTH) ACCESS(READ) ID(DBADB2T)
  PE    OPER    CL(TSOAUTH) ACCESS(READ) ID(DBADB2T)
  PE    ACCT    CL(TSOAUTH) ACCESS(READ) ID(DBADB2T)
/*
//*
//DFALIAS EXEC PGM=IDCAMS,REGION=4M,COND=(0,LT)
//SYSPRINT DD  SYSOUT=*
//SYSIN    DD  *
  DEF ALIAS(NAME('DBADB2T') RELATE('USERCAT.TSOUSERS'))
/*
//*
//MKDIR   EXEC PGM=BPXBATCH,PARM='SH',REGION=8M,COND=(0,LT)
//SYSPRINT DD  SYSOUT=*
//STDOUT   DD  SYSOUT=*
//STDERR   DD  SYSOUT=*
//STDPARM  DD  *
SH mkdir -p /u/dbadb2t/work
SH mkdir -p /u/dbadb2t/tmpdir
/*
NB – we do eventually tidy up USS file ownership and permissions, later on.
Creating the Filesystems
We created both the work and the temp directory filesystems as 2GB. Ideally, the mounts should be reflected in the PARMLIB BPXPRMxx / IEASYSxx OMVS entries:
//NEWZFS  EXEC PGM=IDCAMS,REGION=4M,COND=(0,LT)
//SYSPRINT DD  SYSOUT=*
//SYSIN    DD  *
  DEFINE CLUSTER(NAME('TOOLS.DBADB2T.WORK.ZFS') -
                 LINEAR                         -
                 MEGABYTES(2000 200)            -
                )                               -
            DATA(NAME('TOOLS.DBADB2T.WORK.ZFS.DATA'))

  DEFINE CLUSTER(NAME('TOOLS.DBADB2T.TMPDIR.ZFS') -
                 LINEAR                           -
                 MEGABYTES(2000 200)              -
                )                                 -
            DATA(NAME('TOOLS.DBADB2T.TMPDIR.ZFS.DATA'))
/*
//*
//INITF1  EXEC PGM=IOEAGFMT,REGION=0M,
// PARM=('-aggregate TOOLS.DBADB2T.WORK.ZFS'),
// COND=(0,LT)
//SYSPRINT DD  SYSOUT=H
//STDOUT   DD  SYSOUT=H
//STDERR   DD  SYSOUT=H
//SYSUDUMP DD  SYSOUT=H
//CEEDUMP  DD  SYSOUT=H
//*
//INITF2  EXEC PGM=IOEAGFMT,REGION=0M,
// PARM=('-aggregate TOOLS.DBADB2T.TMPDIR.ZFS'),
// COND=(0,LT)
//SYSPRINT DD  SYSOUT=H
//STDOUT   DD  SYSOUT=H
//STDERR   DD  SYSOUT=H
//SYSUDUMP DD  SYSOUT=H
//CEEDUMP  DD  SYSOUT=H
//*
//MOUNT   EXEC PGM=IKJEFT01,REGION=4M,COND=(0,LT)
//SYSTSPRT DD  SYSOUT=*
//SYSTSIN  DD  *
MOUNT FILESYSTEM('TOOLS.DBADB2T.WORK.ZFS') +
      MOUNTPOINT('/u/dbadb2t/work') +
      TYPE(ZFS) MODE(RDWR)

MOUNT FILESYSTEM('TOOLS.DBADB2T.TMPDIR.ZFS') +
      MOUNTPOINT('/u/dbadb2t/tmpdir') +
      TYPE(ZFS) MODE(RDWR)
/*
You will need mount authority (RACF class UNIXPRIV, SUPERUSER.FILESYS.MOUNT, READ access).
USS Environment Script
As we are using the default shell for our user (/bin/sh), the environment can be configured with a script in our HOME directory:
/u/dbadb2t/.profile
Like this:
export JAVA_HOME=/usr/lpp/java/J8.0_64
export ZOA=/usr/lpp/IBM/zoautil
export RKT=/rocket

export PATH=/bin:$JAVA_HOME/bin
export PATH=$PATH:$ZOA/bin
export PATH=$PATH:$RKT/bin

export LIBPATH=/lib:/usr/lib:$JAVA_HOME/bin
export LIBPATH=$LIBPATH:$JAVA_HOME/lib/s390
export LIBPATH=$LIBPATH:$JAVA_HOME/lib/s390/j9vm
export LIBPATH=$LIBPATH:$JAVA_HOME/bin/classic
export LIBPATH=$LIBPATH:$ZOAlib

export CLASSPATH=$JAVA_HOME/lib:$JAVA_HOME/lib/ext
export CLASSPATH=$CLASSPATH:$ZOA/lib/*

export IBM_JAVA_ENABLE_ASCII_FILETAG='ON'
export _BPXK_AUTOCVT='ON'
export _CEE_RUNOPTS='FILETAG(AUTOCVT,AUTOTAG) POSIX(ON)'
export _TAG_REDIR_ERR='TXT'
export _TAG_REDIR_IN='TXT'
export _TAG_REDIR_OUT='TXT'
Having set all of this up, we need to change the ownership and set some file permissions so that DBADB2T can own and use it all. In the USS shell (TSO OMVS):
chown -R dbadb2t:db2tadm /u/dbadb2t
chmod -R 775 /u/dbadb2t
Creating SSH Keys
We want to create SSH keys to allow Jenkins to connect to DBADB2T without having to have its password. We do this by creating a public and private key pair, and installing the private one in Jenkins (it encrypts it). This is used with the public key – which we save into DBADB2T’s authorised key list to allow SSH to connect without further intervention.
We’re setting this up without passphrases, but if you’d like that extra safety you can specify it when generating the keys, and when installing the private key in Jenkins.
To generate the keys, on USS as DBADB2T – we logged in to SSH using Putty, but you can do this from OMVS (TSO OMVS):
ssh-keygen -t ecdsa
With no passphrase:
$ ssh-keygen -t ecdsa
Generating public/private ecdsa key pair.
Enter file in which to save the key (/u/dbadb2t/.ssh/id_ecdsa):
Created directory '/u/dbadb2t/.ssh'.
Enter passphrase (empty for no passphrase):
Enter same passphrase again:
Your identification has been saved in /u/dbadb2t/.ssh/id_ecdsa.
Your public key has been saved in /u/dbadb2t/.ssh/id_ecdsa.pub.
The key fingerprint is:
SHA256:blahDeeBlahDeeBlahDeeBlahAndOtherNonsense DBADB2T@S0W1
The key's randomart image is:
+---[ECDSA 256]---+
|         .       |
|        .|.      |
|        .|.      |
|       ..|..     |
|       ..|..     |
|      ...|...    |
|         +       |
|  .............. |
|                 |
+----[SHA256]-----+
This generates private key (/u/dbadb2t/.ssh/id_ecdsa), which looks a bit like this:
-----BEGIN EC PRIVATE KEY-----
OnceUponATimeThereWasABigDogAndHeLikedNothingMoreThanToChaseCats
ButTheCatsDidntLikeThatVeryMuchSoTheyGotATrebuchetAndFiredTheDog
IntoTheNextCountyButWithAParachute==
-----END EC PRIVATE KEY-----
and public key (/u/dbadb2t/.ssh/id_ecdsa.pub), which is a bit like this, but less silly:
ecdsa-sha2-nistp256
UnfortunatelyForTheCatsTheDogManagedToBorrowAMopedFromTheFarmerWhoOwnedT
heFarmWhereHeLandedAndHeManagedToGetAllTheWayBackHomeAgainToChaseCats
DBADB2T@S0W1
Add the public key to the authorised keys file:
cat /u/dbadb2t/.ssh/id_ecdsa.pub >> /u/dbadb2t/.ssh/authorized_keysWe’ll use the private key when we define the node (see below).
Creating The Node
We create the node from the Jenkins web portal. Logon as a user with admin authority, then, from the Dashboard:
• Manage Jenkins -> Manage Nodes and Clouds -> New Node
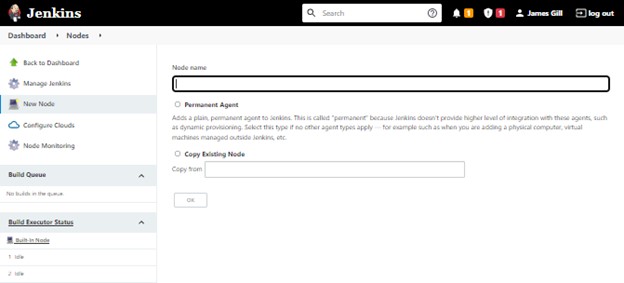
- Node name = DB2T Admin
- Permanent Agent = selected
- OK
Then set the parameters for the new node:
- Name : DB2T Admin
- Description : DB2T z/OS DBA Agent
- Number of executors : 1
- Remote root directory : /u/dbadb2t/work
- Labels : zos db2t dbadb2t
- Usage : only build jobs with label expressions matching this node
- Launch method : Launch agents via SSH
- Host : host IP address or name
- Credentials : Click on the “Add” pull-down and select “Jenkins credential provider”
- Domain : Global credentials
- Kind : SSH username with private key
- ID : DB2T-DBA-on-zOS
- Description : DB2T DBA on z/OS
- Username : dbadb2t (this is the z/OS user we setup)
- Private key : Select “Enter key directly”, then click on the “Add” button
- Supply the private key that we generated previously with ssh-keygen, including the header and footer – from our made up example:
-----BEGIN EC PRIVATE KEY-----
OnceUponATimeThereWasABigDogAndHeLikedNothingMoreThanToChaseCats
ButTheCatsDidntLikeThatVeryMuchSoTheyGotATrebuchetAndFiredTheDog
IntoTheNextCountyButWithAParachute==
-----END EC PRIVATE KEY-----
-
-
- Supply the passphrase if you used one when driving ssh-keygen
- Click Add
- Now you can select the credentials “dbadb2t (DB2T DBA on z/OS)”.
-
- Host key verification strategy : Non verifying verification strategy
- Click on the “Advanced” button:
- Port : 22
- This is the standard SSH port number
- Java path : /usr/lpp/java/J8.0_64/bin/java
- From the Overview, above
- JVM options : -Xms128m -Xmx512m -Dfile.encoding=ISO8859-1 -Xnoargsconversion -Djava.io.tmpdir=/u/dbadb2t/tmpdir
- All of these are required, although the stack sizes can be adjusted for your needs, the file encoding, turning off arguments codepage conversaion and setting the temp directory are required for z/OS nodes
- Prefix start agent command : . /u/dbadb2t/.profile && env | sort &&
- The leading dot is required to ensure that the environment sticks. This part should read “dot, space, slash you, slash…”
- The “env | sort” spools the active environment variables (ordered) to the node console, which is immensely useful when debugging
- The “&&” concatenates command strings together, so these prefixes are all run and applied to the process that will start the node
- There is a trailing space after the last “&&” which MUST be there as well
- Connection timeout in seconds : 1200
- Getting Java applications running on a zPDT z/OS instance can be a little slow. If you’re doing this on real Z, this setting can be skipped
- Port : 22
- Availability : Keep this agent online as much as possible
- Jenkins starts the agent when it starts and only shuts it down when it closes down itself.
- Tool locations : Selected and click Add
- Name : (Git) Default
- Location : /rocket/bin/git
- From the Overview section, above
- Click SAVE!
When you click Save, Jenkins will attempt to launch your agent. This involves starting the SSH connection:
SSHLauncher{host='192.168.225.225', port=22, credentialsId='DB2T-DBA-on-zOS', jvmOptions='-Xms128m -Xmx512m -Dfile.encoding=ISO8859-1 -Xnoargsconversion -Djava.io.tmpdir=/u/dbadb2t/tmpdir', javaPath='/usr/lpp/java/J8.0_64/bin/java', prefixStartSlaveCmd='. /u/dbadb2t/.profile && env | sort && ', suffixStartSlaveCmd='', launchTimeoutSeconds=1200, maxNumRetries=10, retryWaitTime=15, sshHostKeyVerificationStrategy=hudson.plugins.sshslaves.verifiers.NonVerifyingKeyVerificationStrategy, tcpNoDelay=true, trackCredentials=true}
[01/17/22 17:50:53] [SSH] Opening SSH connection to 192.168.225.225:22.
[01/17/22 17:50:56] [SSH] WARNING: SSH Host Keys are not being verified. Man-in-the-middle attacks may be possible against this connection.
[01/17/22 17:50:57] [SSH] Authentication successful.
[01/17/22 17:50:58] [SSH] The remote user's environment is:
@="sh"
ERRNO="0"
HOME="/u/dbadb2t"
  :
Copying over the node JAR (remoting.jar):
[01/17/22 17:50:59] [SSH] Starting sftp client.
[01/17/22 17:51:00] [SSH] Copying latest remoting.jar...
[01/17/22 17:51:18] [SSH] Copied 1,507,326 bytes.
And launching the node using the command prefix and JVM settings that we supplied:
[01/17/22 17:51:18] [SSH] Starting agent process: . /u/dbadb2t/.profile && env | sort && cd "/u/dbadb2t/work" && /usr/lpp/java/J8.0_64/bin/java -Xms128m -Xmx512m -Dfile.encoding=ISO8859-1 -Xnoargsconversion -Djava.io.tmpdir=/u/dbadb2t/tmpdir -jar remoting.jar -workDir /u/dbadb2t/work -jar-cache /u/dbadb2t/work/remoting/jarCacheThe channel starts and reports an (expected) error – that Jenkins can’t monitor the amount of available swap space:
Jan 17, 2022 5:52:05 PM org.jenkinsci.remoting.engine.WorkDirManager initializeWorkDir
INFO: Using /u/dbadb2t/work/remoting as a remoting work directory
Jan 17, 2022 5:52:06 PM org.jenkinsci.remoting.engine.WorkDirManager setupLogging
INFO: Both error and output logs will be printed to /u/dbadb2t/work/remoting
<===[JENKINS REMOTING CAPACITY]===>channel started
Remoting version: 4.10
This is a Unix agent
ERROR: Failed to monitor for Free Swap Space
Also:   hudson.remoting.Channel$CallSiteStackTrace: Remote call to DB2T Admin
          :
java.io.IOException: No suitable implementation found: os.name=z/OS os.arch=s390x sun.arch.data.model=64
at org.jvnet.hudson.MemoryMonitor.obtain(MemoryMonitor.java:91)
at org.jvnet.hudson.MemoryMonitor.get(MemoryMonitor.java:57)
at hudson.node_monitors.SwapSpaceMonitor$MonitorTask.call(SwapSpaceMonitor.java:120)
at hudson.node_monitors.SwapSpaceMonitor$MonitorTask.call(SwapSpaceMonitor.java:115)
     :
Agent successfully connected and online
And – as noted in the final message – all okay anyway.
The output referenced here can be seen in the node log (on the left hand side of the Dashboard, select the node under “Build Executor Status”, then “Log”).

In this example we can see that:
- Our zPDT and our Jenkins server don’t use the same time source
- The (nearly) 2 second response time being reported was just after startup and this comes down to 300ms fairly promptly even on a zPDT
Okay, That’s Cool, But What Can I Do with It?
The answer is really “Anything that I can do in USS with the tools that I’ve got there.”
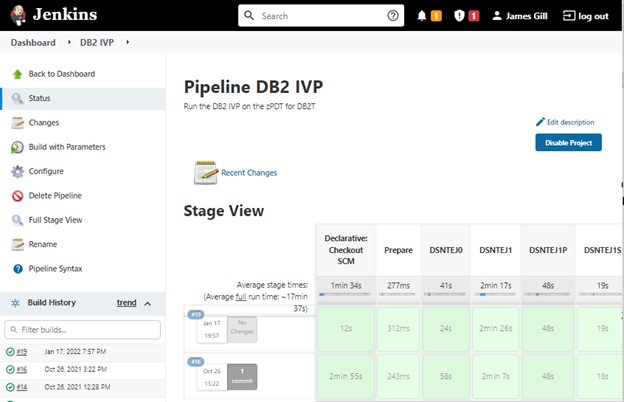
As an example, we thought it might be useful to put the DB2 maintenance IVP (a quick “does it still work?” test pack supplied with DB2) into a Jenkins pipeline. This is made up of (in this case) 20 batch jobs that need to be run one after the other.
In the example below, we use a shared library sourced from GitHub (public access, help yourself!) and a Jenkinsfile pipeline – also sourced from GitHub (again, public access). The shared library (SubmitAndTrack – here) is configured in Jenkins (Manage Jenkins -> Configure System -> Global Pipeline Libraries) like this:
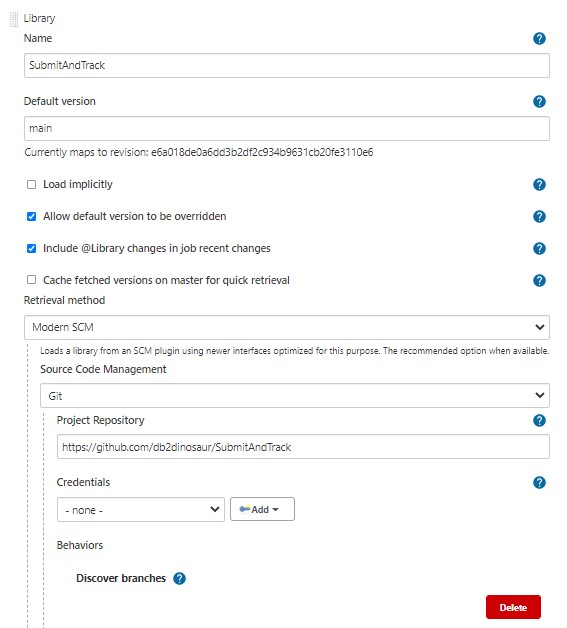
Whilst the pipeline can be found here, and has a parameter (the IVP JCL dataset name):
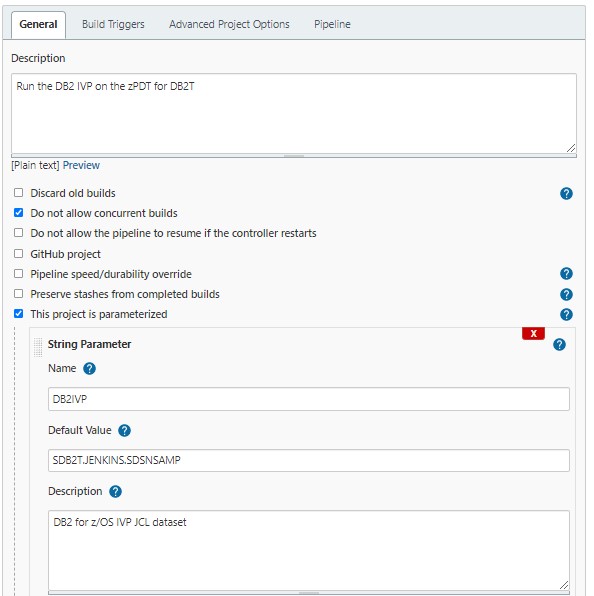
And the pipeline (on GitHub) is configured like this:
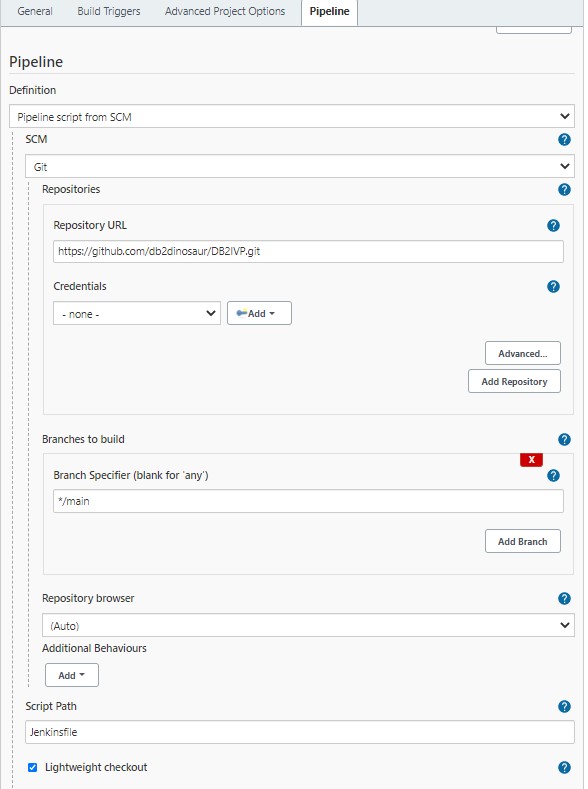
The Jenkinsfile pipeline is made up of a series of calls to the SubmitAndTrack function. This submits JCL from a dataset, checks the status of the job on a loop (1 second sleep) and waits for it to end or run past the maximum wait (parm). It checks the condition code against the parm’d maximum acceptable value and optionally returns the output (default is just JESMSGLG).
Conclusions
Cool huh? There are a number of parts that need to be lined up for this to work, but it won’t cost you very much to make this work other than your own time – and think how much of that you can then save using Jenkins pipelines to automate tasks on z/OS!