

Introduction
In previous blogs in this series, we’ve seen how to install and configure the REST API, and how to create and delete services within it using PHP.
This blog will focus on a simple REST application that displays information based on the IBM supplied sample data.
Application Overview
The Spiffy Computer Company (blame IBM for the name!) need a quick reference telephone directory for each department in the business. They would like a web based client that shows a list of the departments, and when the user clicks on one of these, a list of employees in that department and their phone numbers is also displayed.
The information required to support this is contained in two IBM supplied sample tables:
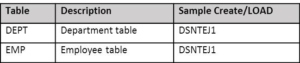
The DSNTEJ1 (create and LOAD data into supplied sample tables) job is shipped with the SDSNSAMP library, but hopefully you already have these created as part of the stock IVP set. DB2 V11 customers can find these with a schema of DSN81110, and V12 customers will have DSN81210.
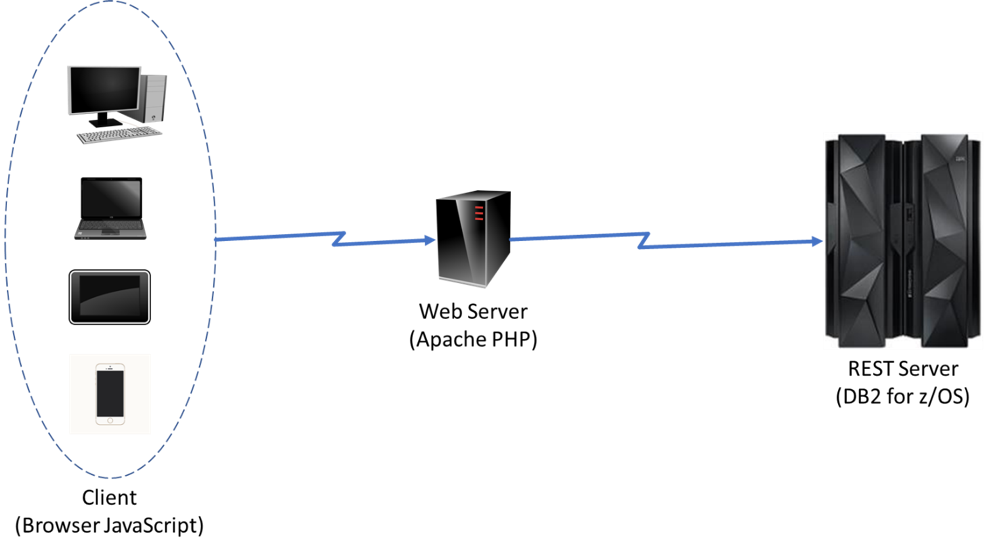
Application Architecture
To make our sample application realistic, we will create it with three tiers:
- Web client (browser, JavaScript)
- Web server (Apache with PHP)
- Data server (DB2 for z/OS)
To paraphrase a colleague: “If the application does a web request and returns JSON – JavaScript Object Notation – then why have you got a web server in the solution?”. The answer to this question highlights one of the “opportunities” with the REST API – namely no support for OPTIONS request.
Unlike PHP, which when asked to issue an HTTP POST request, does exactly that, JavaScript first issues an OPTIONS request to see if the target server will allow it to POST. If it gets a 200 (OK) header listing POST in the services it will accept, then JavaScript goes on to issue the POST. The problem is that DB2 doesn’t know what the OPTIONS request is, and that’s where the conversation ends. This looks, on the face of it, to be a fairly easy one to fix (a catalog auth table, maybe), but then we probably ought to ask how many concurrent internet based JavaScript clients do we want connecting to our production DB2 for z/OS service?
A more “real world” view of REST service provisioning – I think – would be to supply this service to partner businesses, who would necessarily want to wrap it with their own corporate web presence. E.g. an insurance broker driving an insurers REST service to derive a quote, or a car dealer driving a manufacturers REST service to get a list of available models.
In that way, a mid-tier web server makes sense.
So:
Implementation
All of the code referenced in this blog can be downloaded for your entertainment from GitHub:
https://github.com/db2dinosaur/db2-rest-sample
It’s just an example that we (DB2 and z/OS sysprog) put together, and should not be seen as anything other than that. If you want to use it to IVP the function, please feel free, but there’s no warranty, guarantee, etc – your mileage may vary!
The code elements are made up of several different parts:
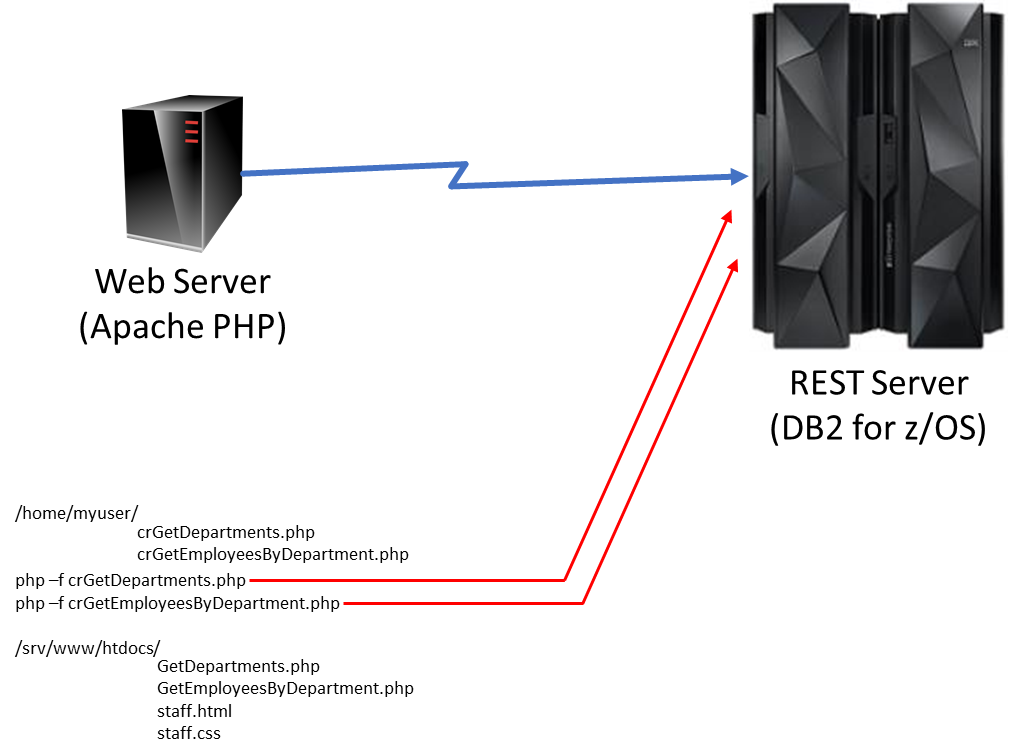
The web page is loaded onto the client from the web server document root. It uses JavaScript (and Ajax) to drive the two web server PHP scripts, which in turn pass the requests to the REST API services on DB2 for z/OS. The services are created by two further PHP scripts and (in the diagram above) are run from the web server, but could be run from anywhere with PHP (with the cURL plugin).
Code
REST Services
There are two REST services which support this sample:
- GetDepartments – which retrieves a list of the departments and their managers from the DEPT table.
This uses the following query:

- GetEmployeesByDepartment – which retrieves a list of employees and the department manager, and their phone numbers.
This uses the following query:
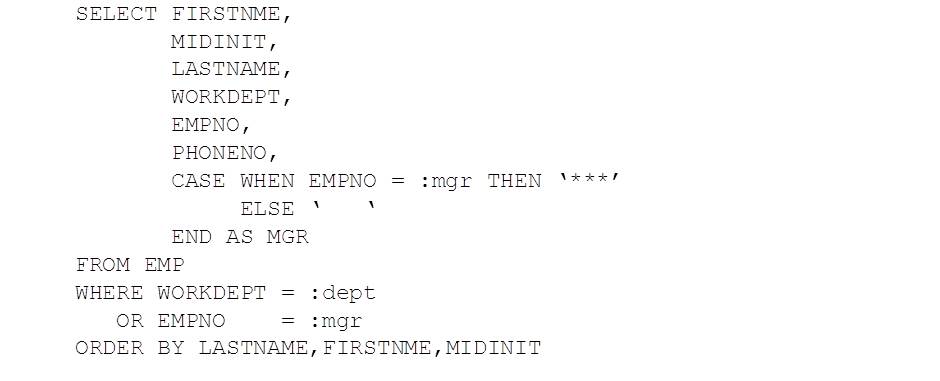
Note that the two parameters (mgr = Manager EMPNO and dept = department ID) are mandatory, the values being retrieved from GetDepartments, above.
They can be created with the supplied PHP code, which is based on the examples in the previous blog post:
- To create GetDepartments
- Edit
crGetDepartments.phpand change:$urlto point to your DB2 TCP/IP address and port number- collectionID to something suitable (that you can BIND to)
- note that qualifier is set to DSN81110 (DB2 V11)
$useridto something suitable for your DB2$pwdto the password for$userid
- Then, create the service using: “
php -f crGetDepartments.php”
- Edit
- To create GetEmployeesByDepartment
- Edit crGetEmployeesByDepartment.php and change:
$urlto point to your DB2 TCP/IP address and port number- collectionID to something suitable (that you can BIND to)
- note qualifier is setto DSN81110 (DB2 V11)
$useridto something suitable for your DB2$pwdto the password for$userid
- Then, create the service using: “
php -f crGetEmployeesByDepartment.php”
- Edit crGetEmployeesByDepartment.php and change:
Web Server PHP
The two PHP modules which run on the web server are intended to provide the link between the JavaScript/Web browser client and the REST DB2 services. They will be driven by AJAX POST requests and will return the JSON returned by DB2.
They both work by forming a POST call (using the PHP cURL plugin) – in the case of GetEmployeesByDepartment, with a parameter array (see below) – and returning the JSON response to the caller.
The GetDepartments.php script has no parameters, and just needs to drive the service:
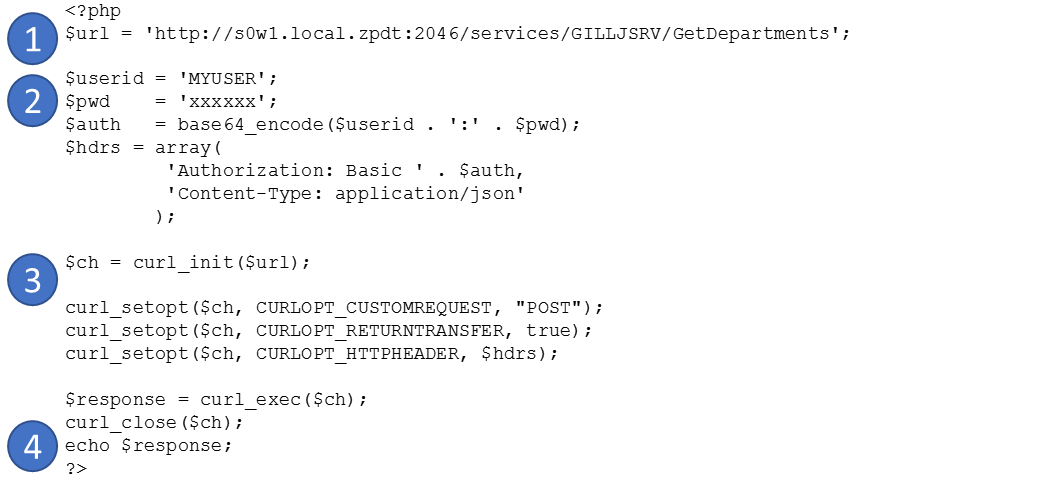
This code works by:
- Setting the URL of the REST service – this takes the form:
https://host-addr:port/services/collection/service-name
Where:- host-addr is the TCP/IP address of the LPAR hosting DB2
- port is the TCP/IP port number that DB2 runs DDF on
- services is the string “services”
- collection is the DB2 package collection name that the service was built into
- service-name is the name given to the service when it was created
- Setting the mainframe userid and password. This is encoded (base64) into the POST request header. Authentication methods are discussed in more detail in the next blog post.
- PHP cURL plugin forms the HTTP POST request and send it to the REST service
- The response from the POST request is returned to the requestor
To make this work for your site:
- Change the
$url- Set the TCP/IP address and port0.
- to point to your DB2 service
- Change the collection ID to the one you used when you ran crGetDepartments.php
- Change
$useridto one which can connect over REST - Change
$pwdto the password for$userid
The GetEmployeesByDepartment.php script takes two parameters (mgr and dept), and these need to be verified before driving the service. We’ll look at the code in two sections:
- Verifying parameters, and
- Making the request
The two things that we want to be sure of before we drive the service request are:
- Have I got both of the parms that I need?
- Are they the right length?
In PHP, parameters sent to a script by POST are delivered in the $_POST array, so:
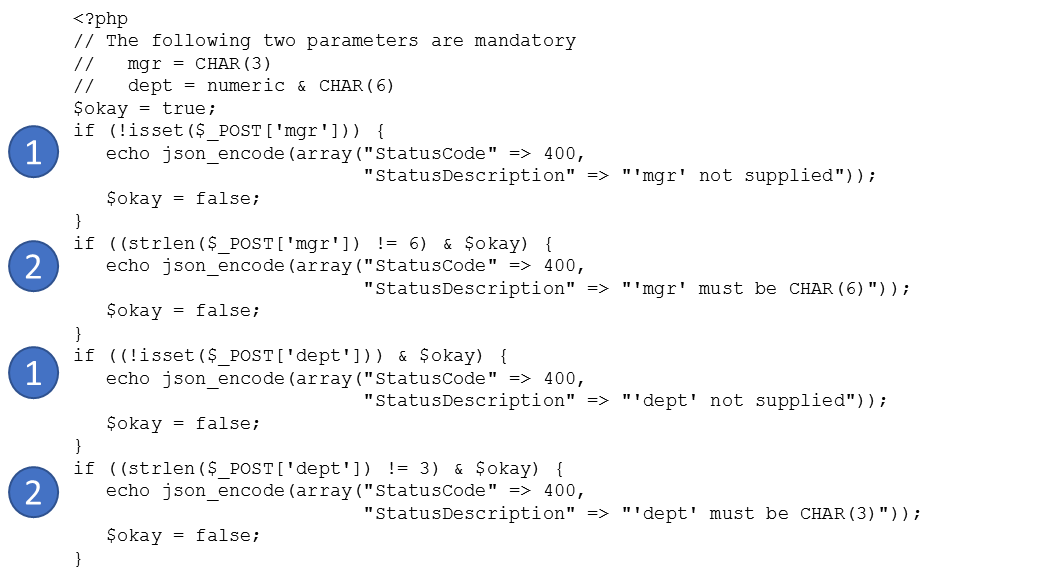
- Check that the required parameter has been supplied, and
- Check that the required parameter is the correct length
Note that the error StatusCode of 400 is a generic “Bad Request” HTTP return. All of the currently valid values can be found here:
https://en.wikipedia.org/wiki/List_of_HTTP_status_codes
I’m rather fond of 418 which was introduced by RFC 2324 – some people have too much time on their hands
If everything is okay with the parameters, we go on to make the request:
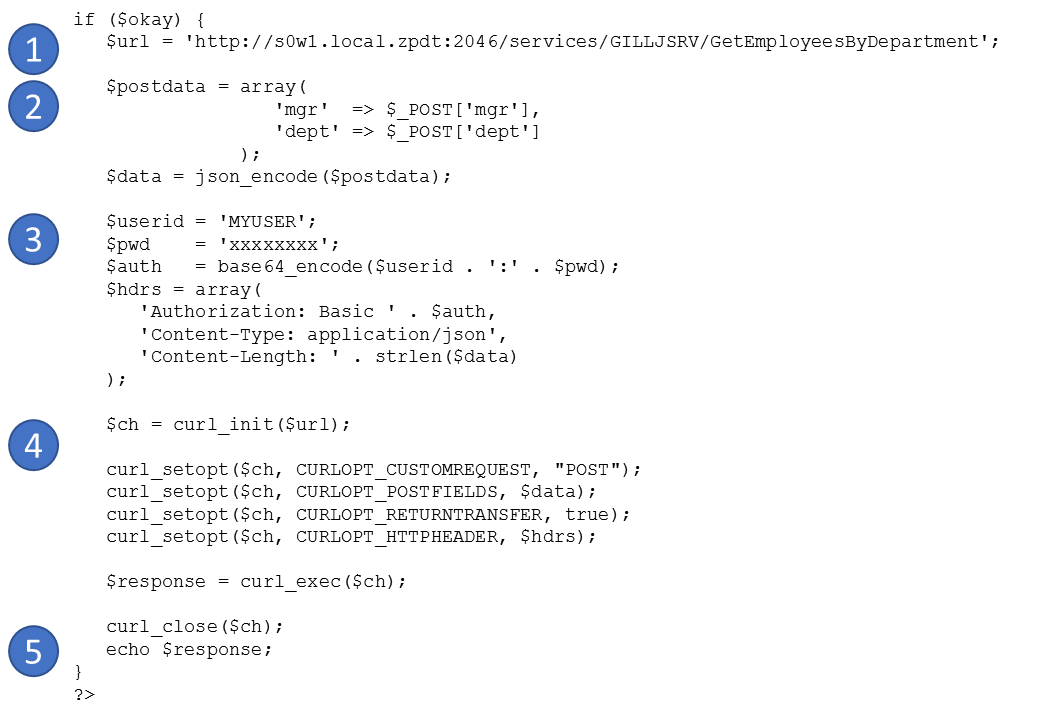
This code works by:
- Setting the URL of the REST service – see above
- Establish and encode the service parameters (“mgr” and “dept”)
- Setting the mainframe userid and password.
- PHP cURL plugin forms the HTTP POST request and send it to the REST service
- The response from the POST request is returned to the requestor
Again, to make this work for your site:
- Change the
$url- Set the TCP/IP address to point to your DB2 service
- Change the collection ID to the one you used when you ran crGetDepartments.php
- Change
$useridto one which can connect over REST - Change
$pwdto the password for$userid
To make these available, we copied them to our Apache server document root (/srv/www/htdocs) so that the web client could POST to them.
Web Client
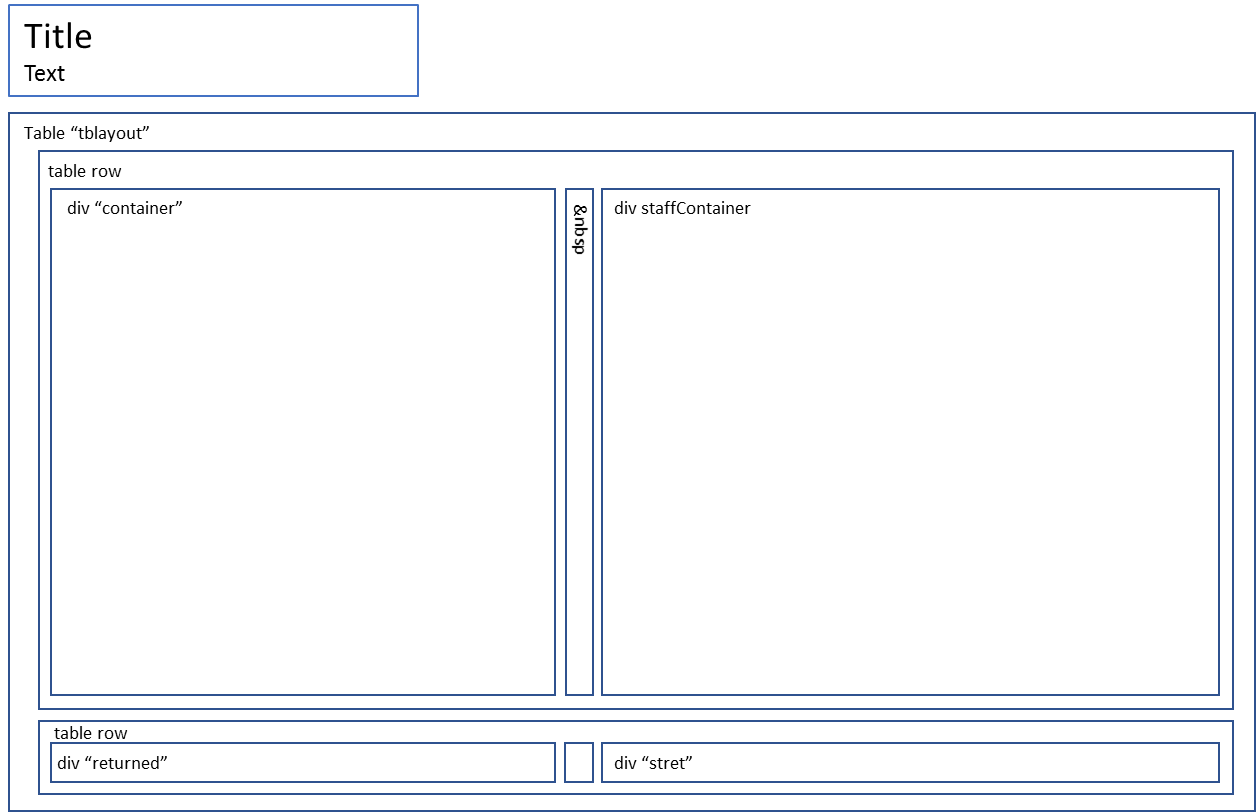
The web page (staff.html and staff.css for the supporting style sheet) should be deployed in the document root of the test web server, along with the GetDepartments.php and GetEmployeesByDepartment.php scripts.
It uses JavaScript to drive the two scripts and format the output into a number of HTML DIV sections, which are laid out like this:
The following sections cover those JavaScript code elements:
When the Page Loads
The following code is executed when the page and its elements have loaded:

The getDepartments() function does the heavy lifting by driving the POST to the GetDepartments.php server script (above) and formatting the returned JSON into the “container” DIV. Note that we use some array variables to provide tracking between the department data that we have loaded, and the GetEmployeeByDepartment.php calls we might make:

These are then populated along with the “container” DIV (list of departments) and the “returned” DIV (status of the REST service call):
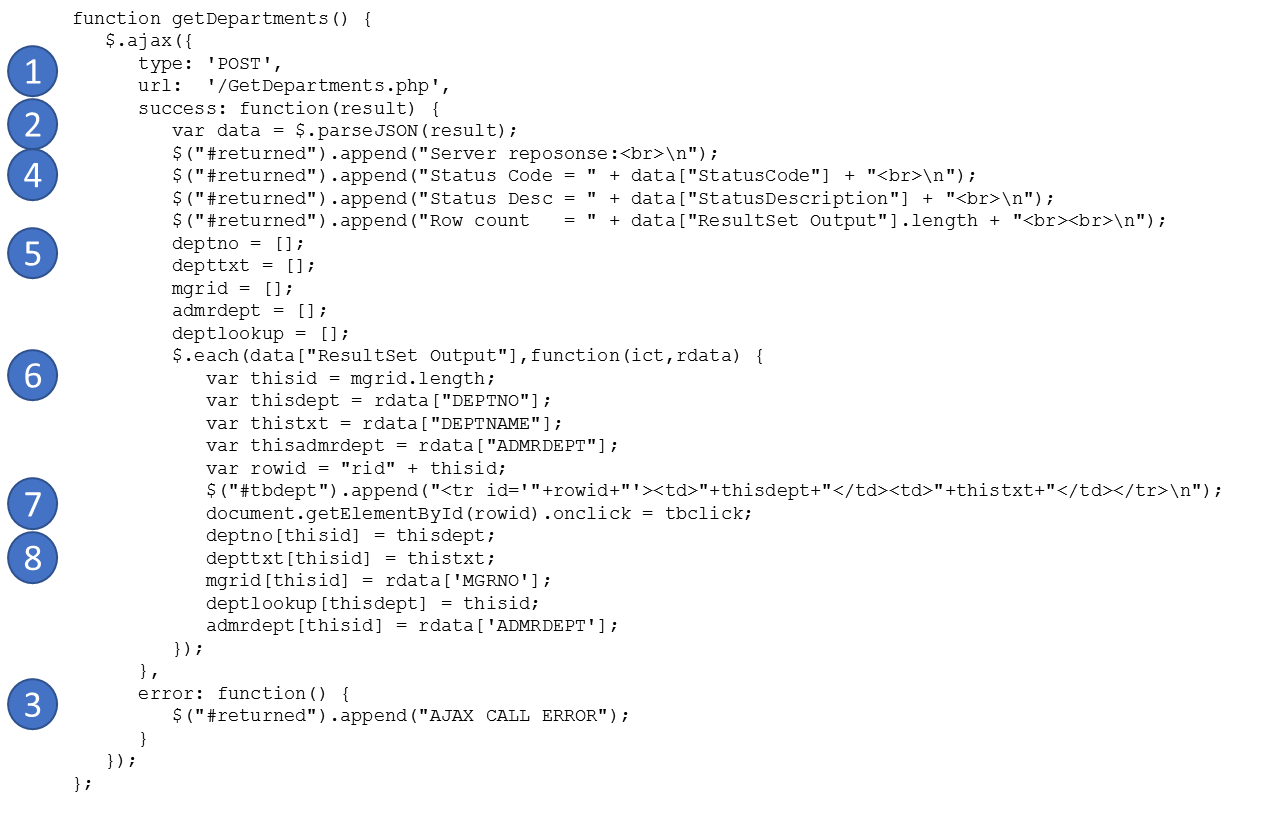
- This is the Ajax HTTP POST request to the GetDepartments.php script in the document root of the web server that sent us this page.
- If the request is successful, execute the following code
- If it isn’t successful, then report the error in the “returned” DIV
- When the POST succeeds, update the “returned” DIV with the status
- And initialize the tracking arrays
- Then for each result set row, capture the data fields. NB “thisid” is set from the current depth of the mgrid array (0, then 1, then 2, etc).
- Format the row and append it to the “tbdept” HTML table. NB each row has an id (“rid” and the “thisid” index), which is what we will use to index the data in the arrays
- Save the data fields for this row in their arrays
When the User Clicks on a Department in the List
Because we applied an id to each of the table rows that holds, when the user clicks on one, the id is supplied to the resulting tbclick() function. As noted above, the id is made up of the text “rid” and a numeric index into the data arrays. By stripping off the “rid”, we return the index into the arrays, and thence access to the relevant data fields:
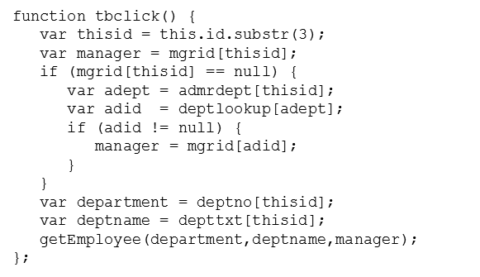
Note that the text name of the department is also passed to the getEmployee() function and is used for the heading for the employee list:
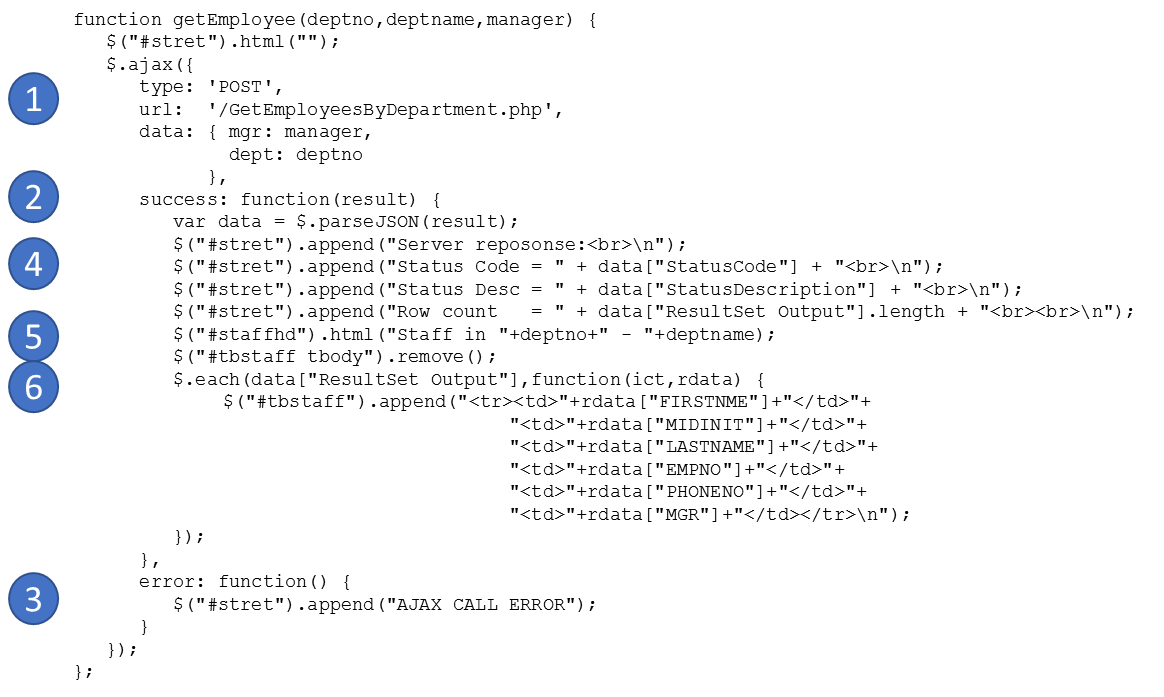
The function works by:
- Issuing the HTTP POST to the GetEmployeesByDepartment.php script in the document root of the web server that served this page, passing it the manager employee number and department id as parameters.
- If the request is successful, the returned JSON data is parsed into a JavaScript array
- If it is not successful, but suitable text into the “stret” DIV
- When the call is successful, update the “stret” DIV with the status information
- Update the heading for the employee data to reflect the requested department name and clear the “tbstaff” table
- For each row returned in the result set, add a row to the “tbstaff” table with the supplied data
Service Testing
The GetDepartments.php script can be driven from the command line to test:
php -f GetDepartments.php
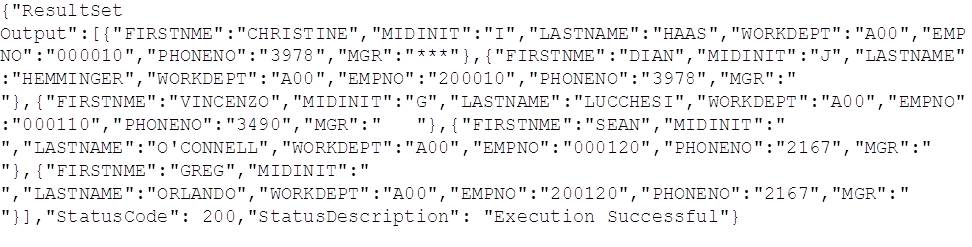
This should produce the following JSON output:
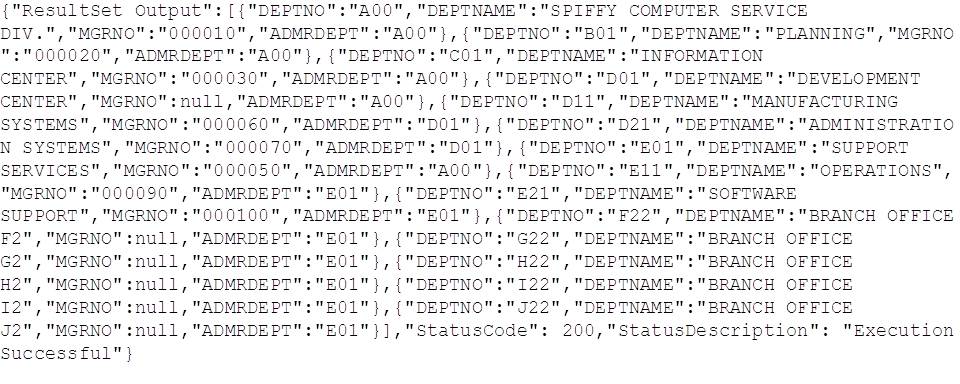
This is made up of:

We also used the following PHP script (testGetEmployeesByDepartment.php) to test the second script:
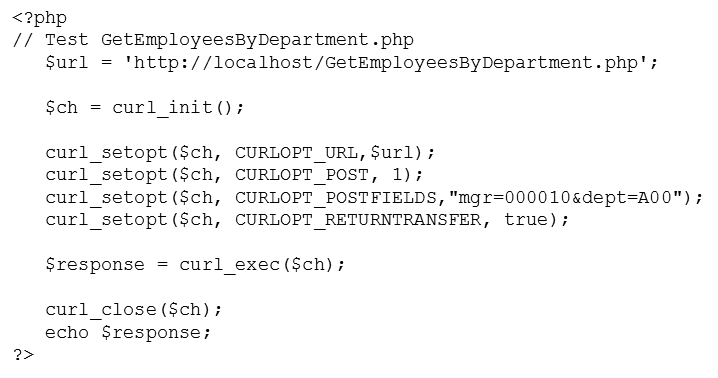
This should produce something like the following:
Bringing It All Together
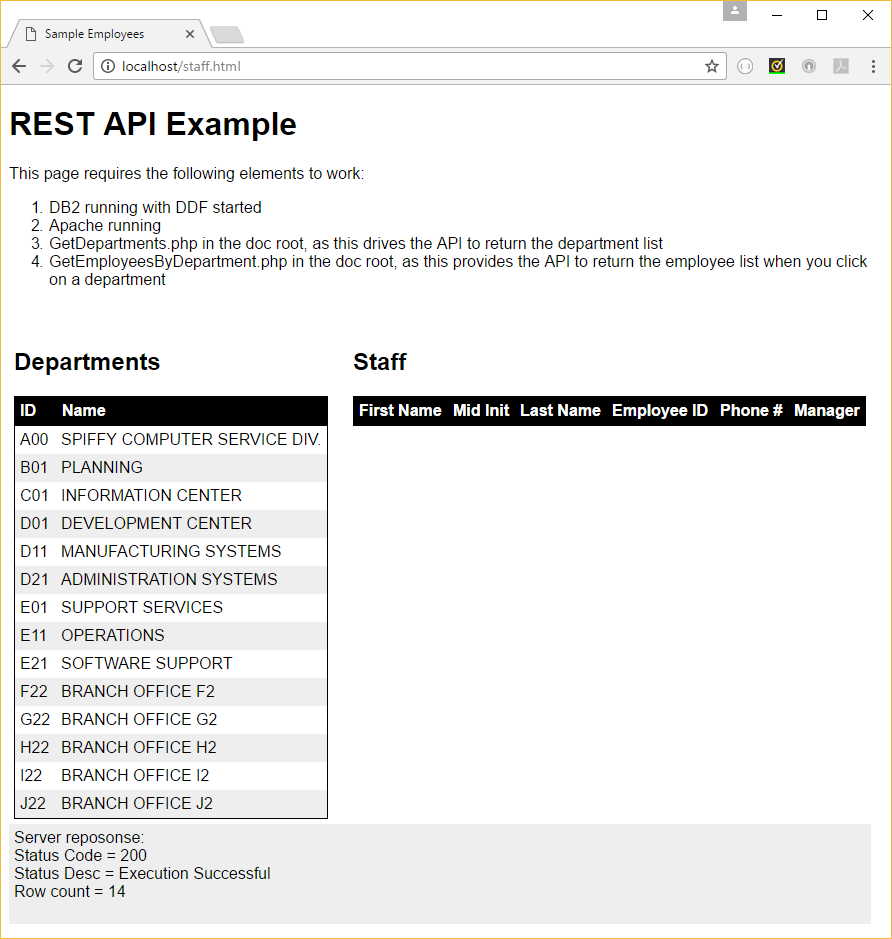
With staff.html copied into the document root of your test web server, you should now be able to address:
https://my.test.web.server/staff.html
Which should produce this:
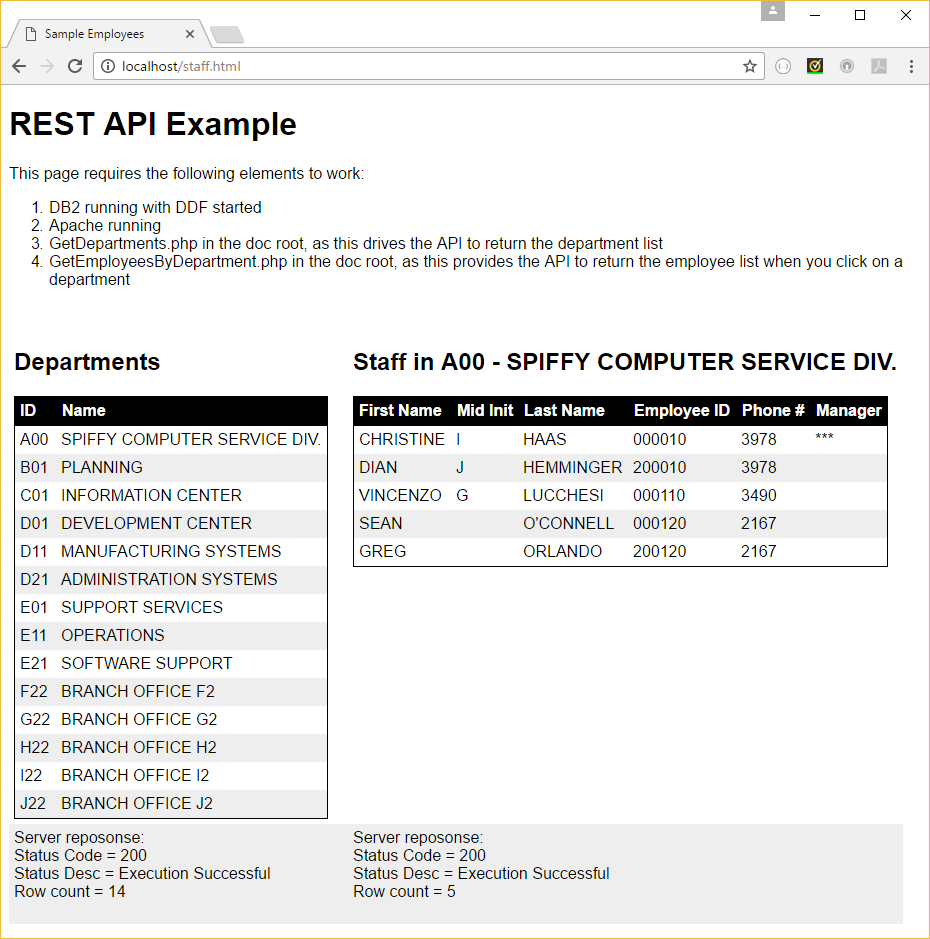
If you click on A00 SPIFFY COMPUTER SERVICE DIV. you should then see:
Next
In the next blog, DB2 Native REST API – Security, we’ll discuss security for this REST solution.
Access all of James Gill’s Native REST API blogs here.