

Introduction
In the previous blogs on the DB2 Native REST API, we’ve talked about installation of the feature, how to create and drop services, and how to drive them. In this one, we’re going to have a look at how security works with REST – both in general HTTP/HTTPS terms, and from the point of view of DB2 for z/OS.
When we think about security, we normally concern ourselves with who can access what. We will need, however, to extend our thinking a little, as we will potentially be involving the internet, so must also add, who can look at my conversation as it goes past?
Then there is the question of audit – who did what to whom? Identifying the user of a service is also important, and this identity also falls within the security scope.
In the following sections we’ll look at:
- Securing DB2 – what security options exist to control access to REST services
- Securing the conversation – HTTP vs HTTPS
- Authorisation ID management – how the requestor identifies themselves to the server
These are deliberately woolly titles, as I think each will require a bit more background to thrash out.
Securing DB2
As with other interfaces, the REST API is protected under the SAF (RACF) DSNR class. The profiles are of the form:
ssid.REST
e.g.
DB01.REST
Any authorisation ID attempting to use the service must have at least READ authority to be able to successfully connect.
Once connected, the usual package privileges apply to the services that have been created – e.g.

Note the quotes to cover mixed case service / package names. These are also required when rebinding packages:

By default, packages are created with VALIDATE(RUN), although this can be overridden in the service creation (see blog # 2).
Securing the Conversation
With internet based conversations, we need to ask the question “Who can see our traffic, and what information could they gather from it?
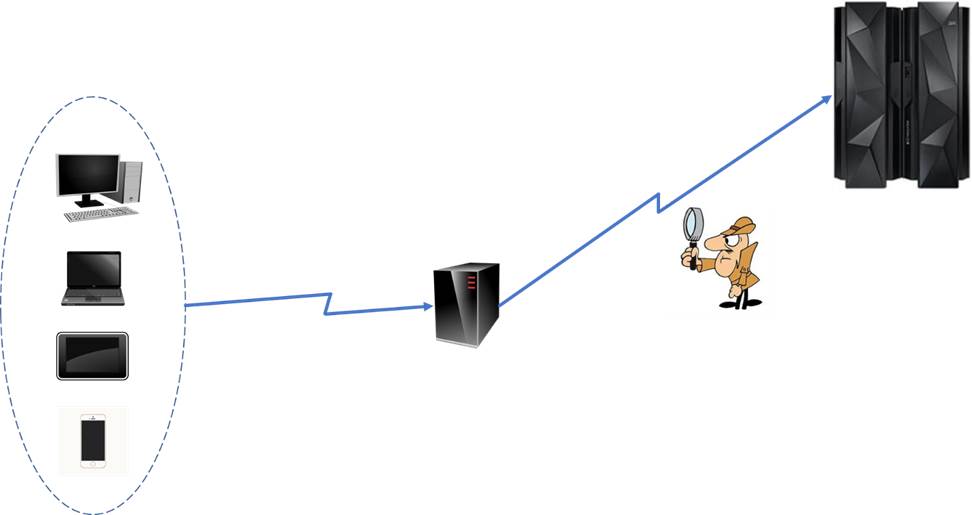
HTTP POST and GET requests necessarily include the parameters of the call in plain text. Because we will need to authenticate our REST service call, we will also need to pass either a userid and password, or a certificate via this connection as well.
To protect the service and the client, we need to do this over an encrypted conversation. HTTPS (HTTP-secure) does this using (in the old days) SSL and (in modern times) AT-TLS.
How Does AT-TLS Establish an Encrypted Connection?
The AT-TLS handshake uses a server digital certificate which contains a public (shareable) and private key. These are used to allow the client and server to form a shared private key that is then used to encrypt the rest of the conversations:
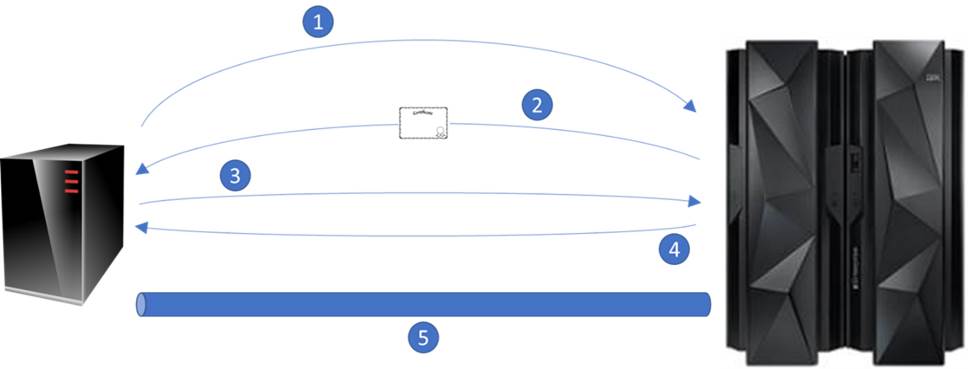
- 1 – The client sends a “Client Hello” message, which tells the server that it wants to connect, and provides a list of cipher suites and TLS versions that the client is prepared to use
- 2 – The server replies – with a “Server Hello” message – giving the selected cipher suite and TLS version as well as its certificate, which includes the public key
- 3 – The client verifies that the server certificate is valid by checking that the “common name” (CN) is correct (it should match the fully qualified network name requested) and that the “signed by” CA is trusted. The client then extracts the servers public key from the certificate and uses this to encrypt a new “pre-master” key. This is then sent to the server
- 4 – The server uses its private key to de-crypt the pre-master key. The client and server now both use this to computer a shared secret key.
- The client sends the server a verification message encrypted using the shared secret key.
- The server de-crypts this and uses the shared secret key to send an encrypted verification response.
- 5 – The encrypted channel is now established.
How Does DB2 Make Use of AT-TLS?
As it happens, DB2 just consumes the encrypted conversations – they are actually established and maintained by the TCPIP (z/OS Communications Server) policy agent (PAGENT). Configuring this is outside the scope of this blog post, but if there’s enough interest, we can cover it in the future.
Suffice to say – and as mentioned above – it all works by the magic of digital certificates.
Certificate Authorities
To start off with, both computers involved in the encrypted conversation must agree to trust a certificate authority. This is an entity – represented by a certificate itself – that is used to sign (validate) any certificates used in the encryption process.
There are a number of commercial certificate authorities (CAs) and most of these will have trusted CA certificates already installed on your machine. These can be seen in:
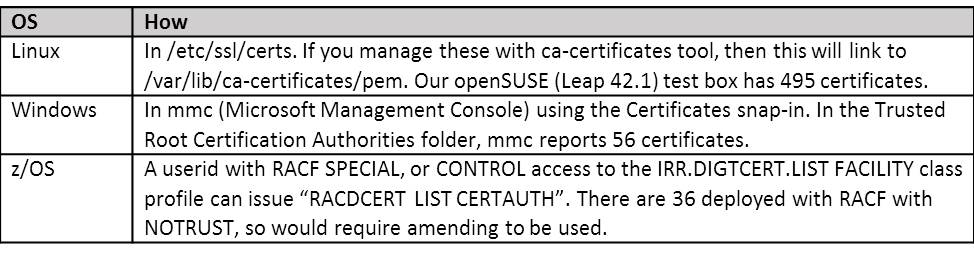
It is possible to use RACF as a CA, but for this to work, you would need to install a RACF generated trusted CA digital certificate onto each potential client machine. If this is a well understood, finite number of clients, this could be managed and a cost effective solution. If, however, the client machines are not all known, or additional certificates cannot be installed on them (as part of a “setup” process), then you will need to use a commercial CA to sign the server certificates that you will be using.
The following is a quick run through of how to setup the digital certificates to support AT-TLS if you are using RACF as the CA.
Using RACF as a CA
For DB2 to present an appropriate server certificate, we need to setup a certificate keyring for the started task userid that runs DDF. In the example below, we’ll refer to subsystem DC01, with DDF STC DC01DIST and STC userid DC01STC.
A keyring is just what it sounds like – it’s a place for a userid to keep all of its keys (certificates) together in one place.
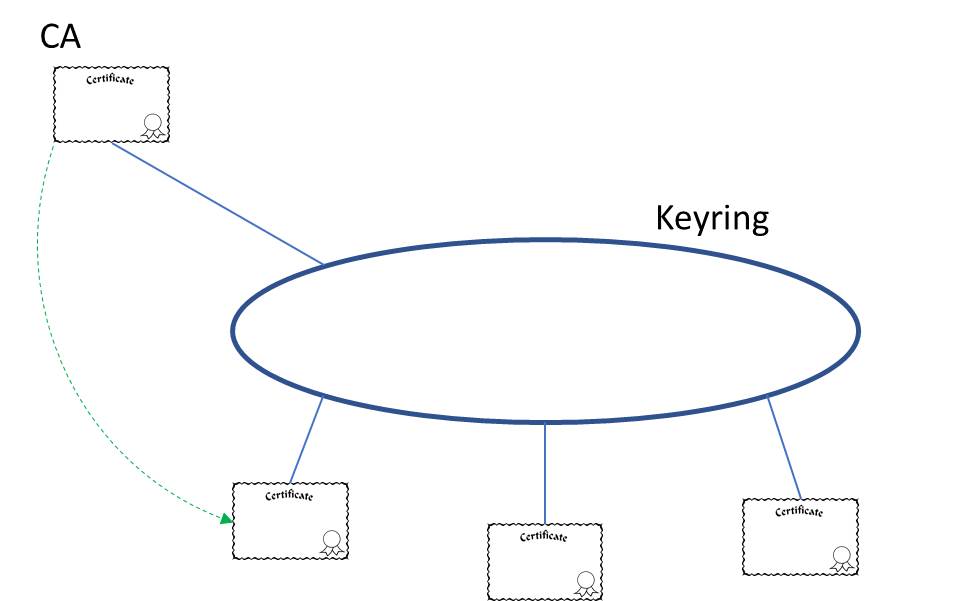
As we are using a RACF derived trusted CA certificate, that needs to be on the keyring as well. To create a trusted CA in RACF requires SPECIAL authorisation:
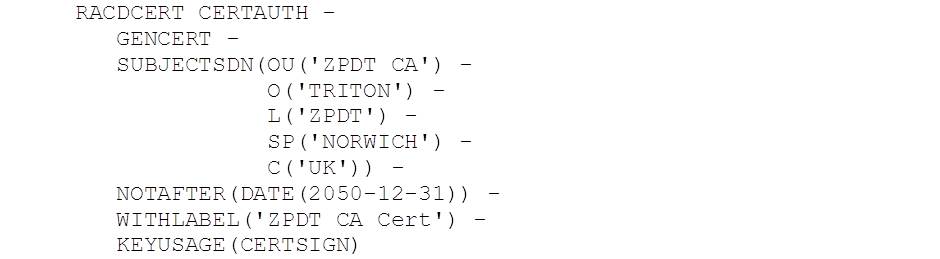
As we’ll see below, this CA (like all of the certificates) is referenced in RACF by its label.
Next we need to create the server certificate for DDF, and sign this with our new CA:
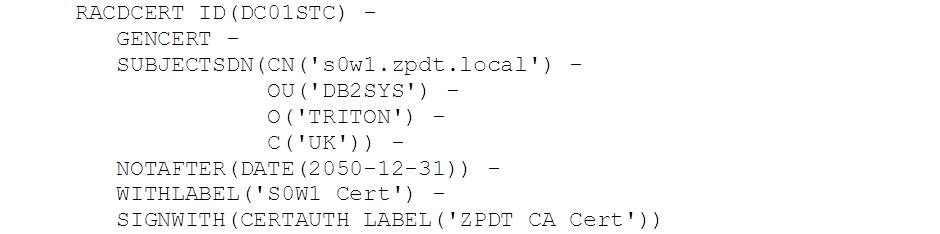
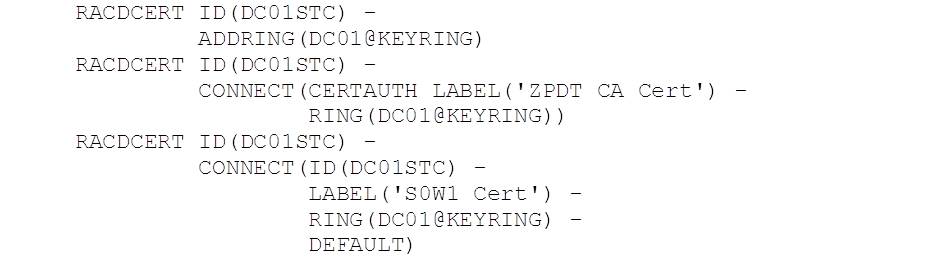
Next, we create the keyring for DC01STC and connect the CA and server certificate for s0w1.zpdt.local, where DC01 runs:
And finally we export the CA certificate so that it can be downloaded and installed on client machines:

Authenticating the Client
Authentication between the service requestor and our DB2 REST server can be managed in several ways. HTTP supports a number of methods – Basic and Digest – and we should also consider client certificates, as these can be associated in RACF with userids to provide security context.
HTTP Authentication
The most straightforward HTTP method is the one used in the previous blog examples – Basic. This takes a plain text userid and password and encodes it:
PHP:

Java:

Without conversation encryption, this method is not secure, as the data can be turned back into readable colon separated userid and password with the equivalent decode functions.
If an attempt is made to connect without authorisation, Basic is the authentication method that the DB2 REST API asks for in the returned HTTP headers:

This seems to rule out the use of HTTP Digest authentication, which relies on the returned 401 header sending over a request for Digest authentication including a “nonce”, which is a server generated single use value which is used to establish the digest.
HTTPS Client Certificate Authentication
Within RACF, we can create a certificate for a user, and deploy this on the client machine. If we then update the TCPIP policy agent (PAGENT) HandshakeRole from Server to ServerWithClientAuth, the client certificate can be used to authenticate our request and this will then run with the context of the associated userid.
This functionality is – at the time of writing (April 2017) – broken. The HTTPS encryption is established but the client certificate does not get authenticated with RACF and the client authentication conversation fails. This results in DDF sending back the 401 Basic header, which requests a userid and password. The DB2 labs are working on a fix for this.
UPDATE (12/5/2017): IBM are in the process of delivering a fix for this problem under APAR PI80087 (V11) and PI80088 (V12).
Next
In the next blog in this series, we’ll look at CLOBs and BLOBs
Access all of James Gill’s Native REST API blogs here.