
Jupyter notebooks are a popular way to query DB2 databases. The ease of use to set up a notebook and run complex queries with rich visualisations make them ideal for quickly demonstrating concepts and data trends. As the notebooks run Python code, this gives us the opportunity to use another tool useful for spinning up demonstration environments – Docker. To do this we use the Docker SDK for Python – in this blog we look at how to spin up a Docker container and run a query against the container all from one notebook. If you would like to use this code yourself, there is a link to download the notebook at the bottom of the page.
Creating a Test Server
In this example we’ll use Docker and The Littlest JupyterHub running on a Linux server. If you already have Docker and Jupyter notebooks running on the same machine you should be good to go, but if you’d like to set up your own Azure server to test this out use the first three steps from my DB2 on Docker in Double Time blog to set up the server and install Docker, then run the following:
chmod 666 /var/run/docker.sock

apt install npm

npm install -g configurable-http-proxy

curl https://raw.githubusercontent.com/jupyterhub/the-littlest-jupyterhub/master/bootstrap/bootstrap.py | sudo -E python3 - --admin admin
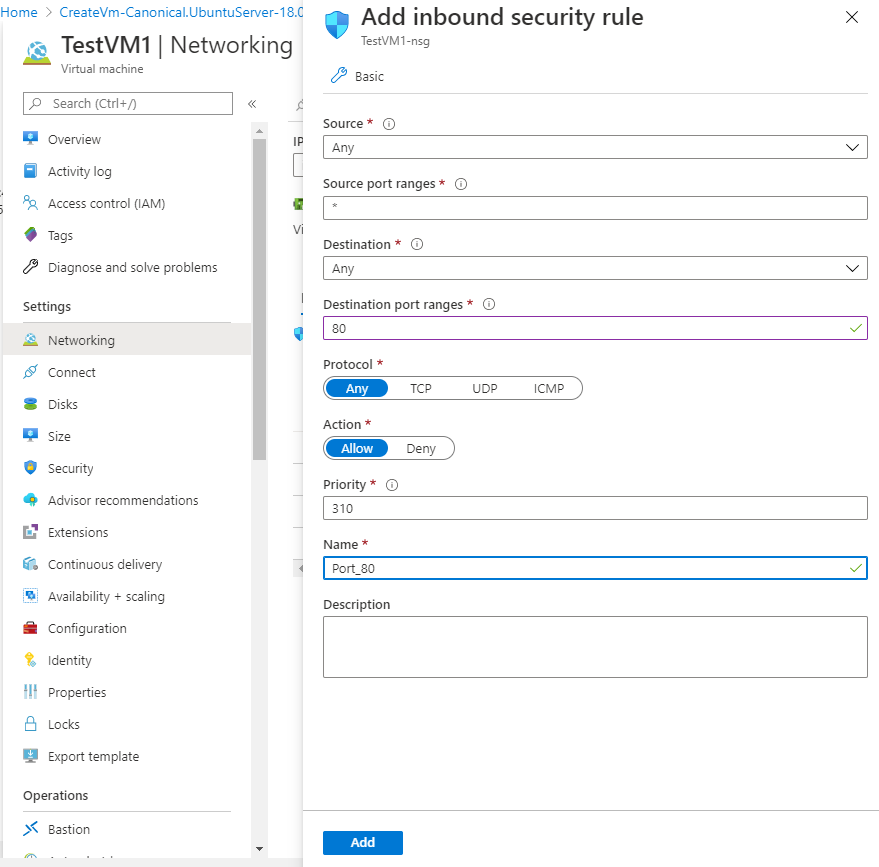
It’s important to note that this setup is fine for a sandbox to test out the features, but isn’t secure enough on its own to host any ‘real’ data. With that in mind, open up port 80 in the Azure firewall by selecting the VM resource, going to Networking and choose Add inbound port rule. Change the Destination port ranges to 80, Name to Port_80 and click Add.
Once the port rule has been applied and TLJH has started up, you can go to the server IP address in your browser and the login page for JupyterHub will appear:
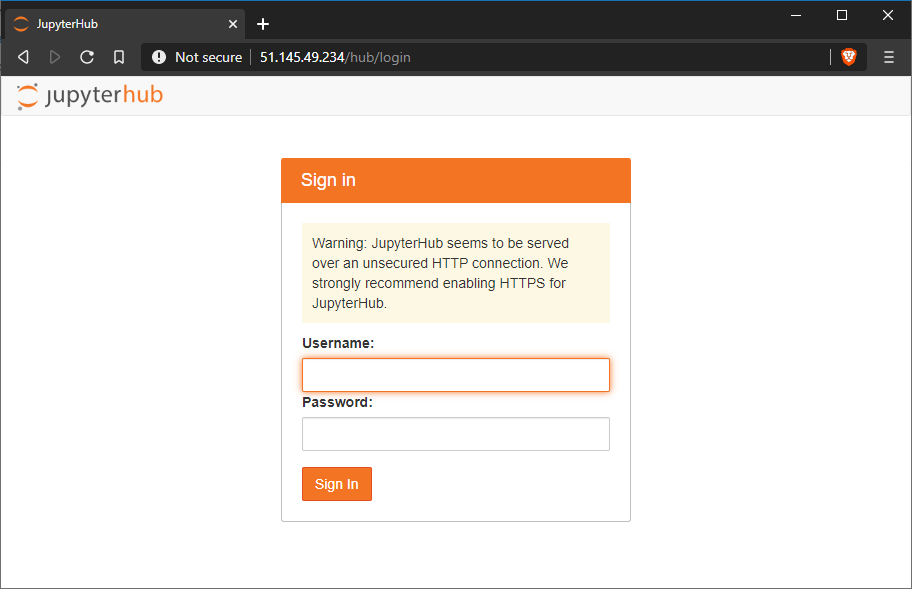
Login using the username ‘admin’ – no password is required, and the notebook list will be presented. Once at the notebook list you can either upload the notebook linked below or create your own.
Set up the Environment
First up is to use pip to install the modules we’re going to use. The docker module provides the Docker-Python SDK functionality, and matplotlib is included to provide a graph of query results later on in the demo. The ibm_db, ibm_db_sa and ipython-sql modules are used to connect to the database and run the demo query. Note the modules are installed with the – – user flag set – this is to ensure they are made available to the user running the current notebook.

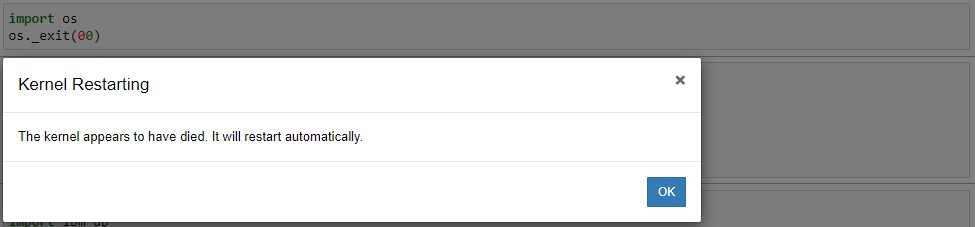
Once the modules are installed we need to restart the Python kernel to pick up the new functionality. This can be achieved by either going to the Kernel menu and choosing Restart, or programmatically by importing the os module and exiting the kernel process – neither is particularly slick as they require confirming dialogue boxes. If you know of a better method to restart the Kernel via code in a cell let me know!
Next we set some variables to use later in the script. This gathers the variables together for convenience, and means if one of the values needs to be changed it can be updated in a single place.

Now it’s time to import the modules we are going to use – I’ve added the time module as we are going to use that later.

Download the DB2 Image and Run the Container
With our modules loaded and variables set it’s time to create our container. First we instantiate a Docker client called cli, then use the client to pull the latest DB2 image from IBM’s repository on Docker Hub. If the image is being pulled for the first time, it may take a few minutes to download.

With the image downloaded locally, we can run a container. The options we’re using in the code below will create a container with the sample database available, and the container will be deleted once it is shut down.

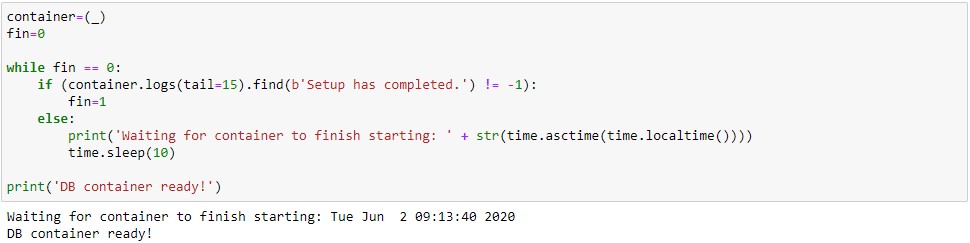
The run command will return very quickly, because starting up the container is fast – however, the DB2 installation inside the container will require a few minutes to be configured and create the sample database. To avoid having to guess when DB2 is ready, we’ll run a small loop of code querying the container logs. This cell also associates the container object to the container created in the previous step.
Running a Query
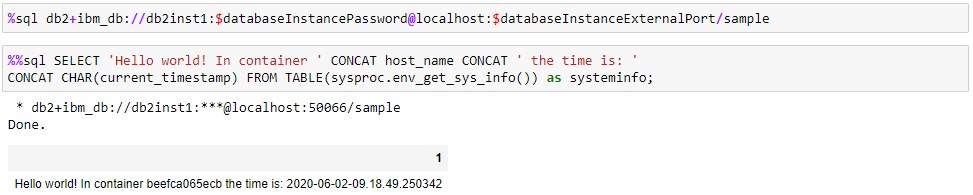
Now the container is running and DB2 is ready, we can connect and run a query. Here’s an example of a simple query demonstrating we are querying a database in the container.
And here’s a query using the same database connection to generate a bar chart using data in the employee group of the sample database.

Removing the Container
Because we set the auto_remove parameter to True when creating the container, all we need to do to remove it is tell Docker to stop the container. This can be useful if you want to start again with the database, as we can run the stop command and then create a new container by restarting the process back at the cli.containers.run cell.

In Summary
This simple example demonstrates how Docker containers can be controlled from Jupyter notebooks. This provides a basis for notebooks that could be used for many purposes – the combination of a clean environment with code and documentation in a notebook is great for training exercises, demos, or prototyping features for example. I’m a particular fan of The Littlest JupyterHub for these activities as it provides a server based Jupyter notebook environment that can be shared by several users and doesn’t require each user to install software locally, so highly recommend you check it out.
Here are some links to resources used in this blog:-
- Microsoft Azure: https://azure.microsoft.com/en-gb/
- Install Docker Engine on Ubuntu: https://docs.docker.com/engine/install/ubuntu/
- IBM’s DB2 image on Docker Hub: https://hub.docker.com/r/ibmcom/db2
- The Littlest JupyterHub: https://tljh.jupyter.org/en/latest/index.html
- Docker SDK for Python: https://docker-py.readthedocs.io/en/stable/
Download the Jupyter notebook here