

Introduction
Container images are ephemeral – by which we mean that they are loaded afresh into memory each time they are started, and when they end, any changes applied in them are lost.
Our challenge in this blog is how to manage those aspects of an application that require some persistent storage – i.e. somewhere we can write our database rows to, so that when the application restarts they are available again.
There are many different Operator and external clustered storage offerings available, but for this blog, as we are basing all of our work on Single Node OpenShift (SNO – see previous blogs), we will make use of the LVM (Logical Volume Manager) operator.
Terminology Reuse
LVM uses the term PV for Physical Volume – i.e. the physical disk, whereas Kubernetes and OpenShift most commonly use PV to refer to a Persistent Volume – the storage behind a Persistent Volume Claim (PVC). To hopefully save confusion, and because this is an OpenShift / Kubernetes blog, we’ll use PV in the PVC sense and LVM-PV for the LVM physical volume.
Details
The server that we’re using to do this work has 372GB of SSD that we did the installation of SNO onto, and 5.4TB of spinning disk, currently with nothing to do.
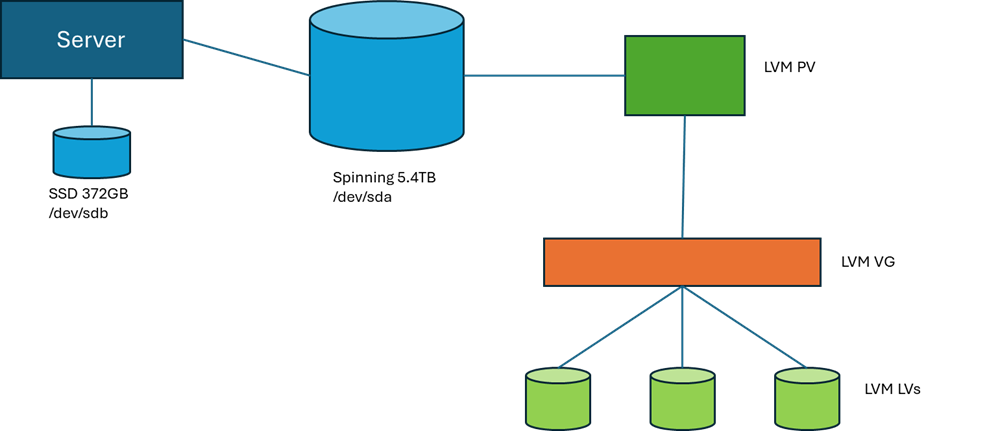
This diagram demonstrates our target configuration. Only the large spinning disk is in scope for our storage model. LVM uses the physical volumes (and partitions) that it has configured as LVM-PVs. These are attached to an LVM Volume Group (VG), which is the storage pool that LVM can then create Logical Volumes (LVs) in. These LVs are presented to the operating system as devices that can have file systems defined on them and mounted to paths.
In the following sections, we’ll run through:
- Installing the LVM Operator
- Selecting disk storage
- Creating the LVMCluster
- Creating a PVC
- Consuming a PVC With a Pod
Installing the LVM Operator
At the risk of initiating a religious war, I’m going to be referring to build and configuration activities through YAML files an CLI “oc” commands, and this is because I prefer performing installation and service tailoring through automation. There are lots of good reasons why this is a really important mindset to get into, but probably start with some what-ifs:
- What if I have to rebuild the service?
- What if I want to create another one?
- What if there’s only me and I have to support 70 clusters?!
Accuracy and repeatability are at the heart of DevOps, so whilst I love the OpenShift web console, I won’t be relying on it and my pointy-clicky skills to deliver the same change every time.
End of public announcement 😊
Installing the LVM operator can be split up into the following activities:
- Create target namespace openshift-lvm-storage
- Create the supporting operator group to link the operator to the namespace
- Create the subscription – note the installPlanApproval = manual
- Approve the install plan
- Check for completion
Running through each of these in order:
Create the Operator Namespace
The namespace can be created from a YAML file:
kind: Namespace
apiVersion: v1
metadata:
  name: openshift-lvm-storage
And the “oc create” command:
oc create -f new-namespace.yamlOr with the “oc” CLI command:
oc create namespace openshift-lvm-storage
Create the Operator Group
The operator group establishes the namespaces that Operator Lifecycle Manager (OLM) keeps an eye on. It establishes the namespace scope for the operator. In this case, the target is a single namespace – the one we defined above.
Using the following YAML – e.g. lvm-operator-group.yaml:
apiVersion: operators.coreos.com/v1
kind: OperatorGroup
metadata:
  name: openshift-lvm-storage-operatorgroup
  namespace: openshift-lvm-storage
spec:
  targetNamespaces:
  - openshift-lvm-storage
And the “oc create” command:
oc create -f lvm-operator-group.yaml
Create the Operator Subscription
The next action is to create the subscription – e.g. lvm-operator-subscription.yaml:
apiVersion: operators.coreos.com/v1alpha1
kind: Subscription
metadata:
  name: lvms
  namespace: openshift-lvm-storage
spec:
  installPlanApproval: Manual
  name: lvms-operator
  source: redhat-operators
  sourceNamespace: openshift-marketplace
Now create the subscription with the “oc create” command:
oc create -f lvm-operator-subscription.yamlNote that we’ve set the approval to manual. This means that some intervention is required on our part before the operator is installed, or more importantly, upgraded. As mentioned at the top of the blog, there are lots of different storage options available to support persistent storage, and you soon learn that surprise automatically upgraded operators are not always your friend!
Approving the Install Plan
As mentioned above, to allow the install plan to be applied, we need to approve the actions. For an initial install, this probably feels a little over the top, but it’s a good habit to get into as it gives you back control on when your operator upgrade activities occur.
First, we need to get the name of the install plan:
oc get installplan -n openshift-lvm-storage
$ oc get installplan -n openshift-lvm-storage
NAME            CSV                     APPROVAL   APPROVED
install-wmpq2   lvms-operator.v4.20.0   Manual     false
When we are ready for it to be actioned, we patch the install plan to mark it as approved:
$ oc patch installplan install-wmpq2 \
    --namespace openshift-lvm-storage \
    --type merge \
    --patch '{"spec":{"approved":true}}'
Checking for Completion
Check in the OpenShift Lifecycle Manager (OLM):
oc get olm -n openshift-lvm-storage
$ oc get olm -n openshift-lvm-storage
      :
NAME                                        DISPLAY     VERSION  PHASE
operators.coreos.com/lvms-operator.v4.20.0  LVM Storage  4.20.0  Succeeded
      :
(apologies to purists – I had to trim the message content to get it to fit on the page!)
As well as checking that the installation has completed, it’s worth making sure that the pods that implement the operator are also started:
oc get pods -n openshift-lvm-storage
Selecting Disk Storage
As noted above, we have some different physical disks involved in our configuration, and we’re aiming to make use of the /dev/sda 5.4TB disk for our LVM storage. As with the OpenShift installation process, it is very important to use the disk ID to identify it to the operator. Whilst it is hugely tempting to use the /dev/xxx naming, the kernel does not guarantee that these names are persistent – especially if there is a physical change in the disks in the server. Always use the disk ID path – determined as shown below:
- Logon to the node with the “core” user – or start a debug terminal if OpenShift is running
- ls -al /dev/disk/by-id/
- The output shows the mapping between the IDs and the /dev labels – e.g.
scsi-36d4ae5209c7401002308485c05dac6e9 -> ../../sdb
Creating the LVMCluster
The LVMCluster is where we define the LVM volume group and align this with the storage class that will be used to refer to it – e.g. lvm-operator-lvmcluster.yaml:
apiVersion: lvm.topolvm.io/v1alpha1
kind: LVMCluster
metadata:
  name: sno-lvmcluster
  namespace: openshift-lvm-storage
spec:
  storage:
    deviceClasses:
    - default: true
      deviceSelector:
        paths:
        - /dev/disk/by-id/ scsi-36d4ae5209c7401002308485c05dac6e9
      fstype: xfs
      name: vg1
      thinPoolConfig:
        chunkSizeCalculationPolicy: Static
        metadataSizeCalculationPolicy: Host
        name: thin-pool-1
        overprovisionRatio: 10
        sizePercent: 90
Note that the device class name is used to create the storage class name – i.e. our vg1 device class will be represented in OpenShift with the storage class name lvms-vg1. Note the device selector in the device class definition, which refers to /dev/sdb by the determined disk ID.
Create the LVMCluster with the “oc create” command:
oc create -f lvm-operator-lvmcluster.yaml
Creating a PVC
In the following example, we create a PVC for a Postgres database using the storage class name that we created above. Note the use of “resources” to set the initial “requests” size, and the maximum “limits” for the size of the PVC – psql-pvc.yaml:
apiVersion: v1
kind: PersistentVolumeClaim
metadata:
  name: postgres-db
  namespace: develop-db
spec:
  accessModes:
    - ReadWriteOnce
  volumeMode: Filesystem
  resources:
    requests:
      storage: 50Gi
    limits:
      storage: 100Gi
  storageClassName: lvms-vg1
Using “oc create”:
oc create -f psql-pvc.yaml
Consuming a PVC With a Pod
Mounting the new PVC into our Postgres pod, we can ensure that the database data is retained in persistent storage:
kind: Pod
apiVersion: v1
metadata:
  name: postgres
  namespace: develop-db
  labels:
    app: develop-db1
    name: develop-db
spec:
  restartPolicy: Always
  containers:
    - name: postgres
      env:
        - name: POSTGRES_DB
          value: psql
        - name: POSTGRES_USER
          value: postgres
        - name: POSTGRES_PASSWORD
          value: postgres
        - name: PGDATA
          value: /apps/db
      ports:
        - containerPort: 5432
          protocol: TCP
      volumeMounts:
        - name: postgres-db
          mountPath: /apps/db
      image: 'postgres:17.7'
  volumes:
    - name: postgres-db
      persistentVolumeClaim:
        claimName: postgres-db
Next Time
In the next blog, we’ll have a look at Perses, which is the new dashboard software alternative to Grafana that Red Hat are bundling in the Cluster Observability Operator.