

New, Final and Old tables are features that have been around in Db2 for several versions, at least back to v9.7, but they don’t seem to get a lot of use. I’m not sure why unless it’s just because they require an extra bit of syntax.
I still spend an appreciable percentage of my working life running scripts for our customers. Quite often something as straight-forward as some Inserts, Updates and Deletes but I think they’re handed to us
- in case they go wrong
- so that we can establish that they’re going to do what is expected; no more, no less
That’s fair enough; we bill ourselves as Db2 experts so applying a bit of rigour and auditability (that is a word; I just looked it up) is what we can add to the equation.
And it’s that auditability where these features can be very useful.
Extra SELECT statements
This is the obvious way of demonstrating that the changes you run are what is expected or hoped. Here’s a couple of examples. Let’s say we have an INSERT statement

That’s what I’ve been given and I’m just going to put this statement into the script

after the INSERT to prove it really did what we wanted

I’m not going to labour the point by giving examples of UPDATE and DELETE statements with similar confirmatory statements but I’m sure you get the gist.
Triggers
Here’s another way of providing confirmation that the changes in IUD statements are doing what is required. What you do is to define triggers on the table in question, or the associated fact table if this is a dimension or reference table. So (without filling up the blog with the whole trigger syntax) you could have something like this in a Trigger

This would mean that every time you make a change to your Fact table (LOGBOOK), and it references a row in the Dimension table (AIRFIELD), the timestamp value in the MOST_RECENTLY_USED column in AIRFIELD gets updated.
That’s a pretty simple auditing function and it doesn’t show what values changed, just that a change was made at a particular date and time. You can make this more sophisticated; include a user ID, or the values that were changed. But we’re now starting to talk about some serious performance impacts (and trigger performance is often an invisible overhead; it doesn’t, for instance, show up in explained access paths).
FINAL Tables etc.
The issues with both of those previous solutions are that they are ‘extra’ processing (as in, use more CPU, I/O, Storage in the latter case) and that they will not necessarily be ‘believed’, either by auditors or maybe the people who requested the scripts to be run in the first place. They are, after all, effectively separate operations.
The advantage of the OLD, NEW and FINAL tables is that they are intrinsically part of the Insert, Update or Delete that you’re executing. Let me show you a couple of examples.
Insert
I’ve got an Insert statement to run, and I want to show what was added. Not the whole thing (this is a simple table, but it might be one with hundreds of columns). So I’m going to take the Insert statement and precede it with the line in grey:
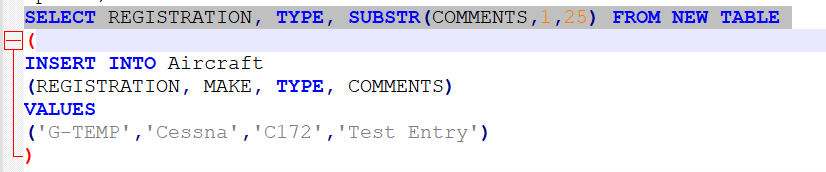
Now when I run it, I don’t just get the message “SQL command completed successfully”, I get this

I have a clear record of what was inserted, produced by the statement that did the Insert.
Delete
Similarly the ‘vanilla’ Delete statement will just give the “SQL command completed successfully” message but I want to show what was deleted. Where the INSERT referred to the NEW TABLE to show what was, well, new, the DELETE refers to the OLD TABLE to display values that have been removed. Again, it’s the line in grey:

And it gives you this

Update
This is where I think this feature really scores. By using the FINAL TABLE option you can show both the before and after values from an UPDATE. Below are the changes that need to be incorporated in the UPDATE statement:
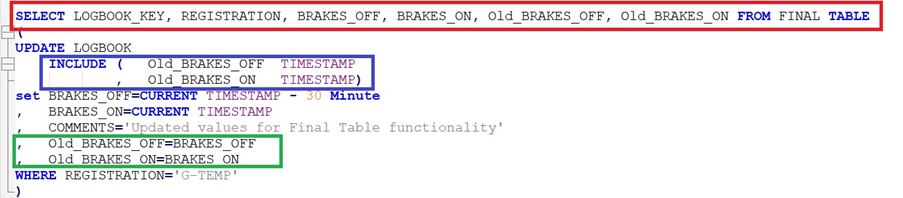
- Red box: the select FROM FINAL TABLE clause that is largely similar to the NEW and OLD table clauses in the previous examples. The difference is the addition of two columns: OLD_BRAKES_ON and NEW_BRAKES_ON which do not exist in the source table
- Blue box: this is the definition for those two ‘new’ columns
- Green box: this is how those two new columns get populated
The result of that statement is shown below.

You now have visibility of the new values for BRAKES_ON and BRAKES_OFF, which come from the FINAL TABLE and the original values, which were set using the INCLUDE columns.
NB, of course, those columns defined in the INCLUDE are not persistent and have disappeared once the UPDATE has been executed.
Conclusion
This is a means of providing visibility of changes and auditability for IUD operations within the statement itself. You might have a bit of explaining to do to an auditor if they’re not from a technical background, but you can demonstrate that there is still just a single operation: a single atomic command, and the results are taken from that. No smoke and mirrors, no opportunity to fudge results.
You can find more information in the Knowledge Centre here Retrieving result sets from an SQL data change statement
or drop me a line if you want to discuss these options or need some more explanation.
E-mail: Mark.Gillis@triton.co.uk